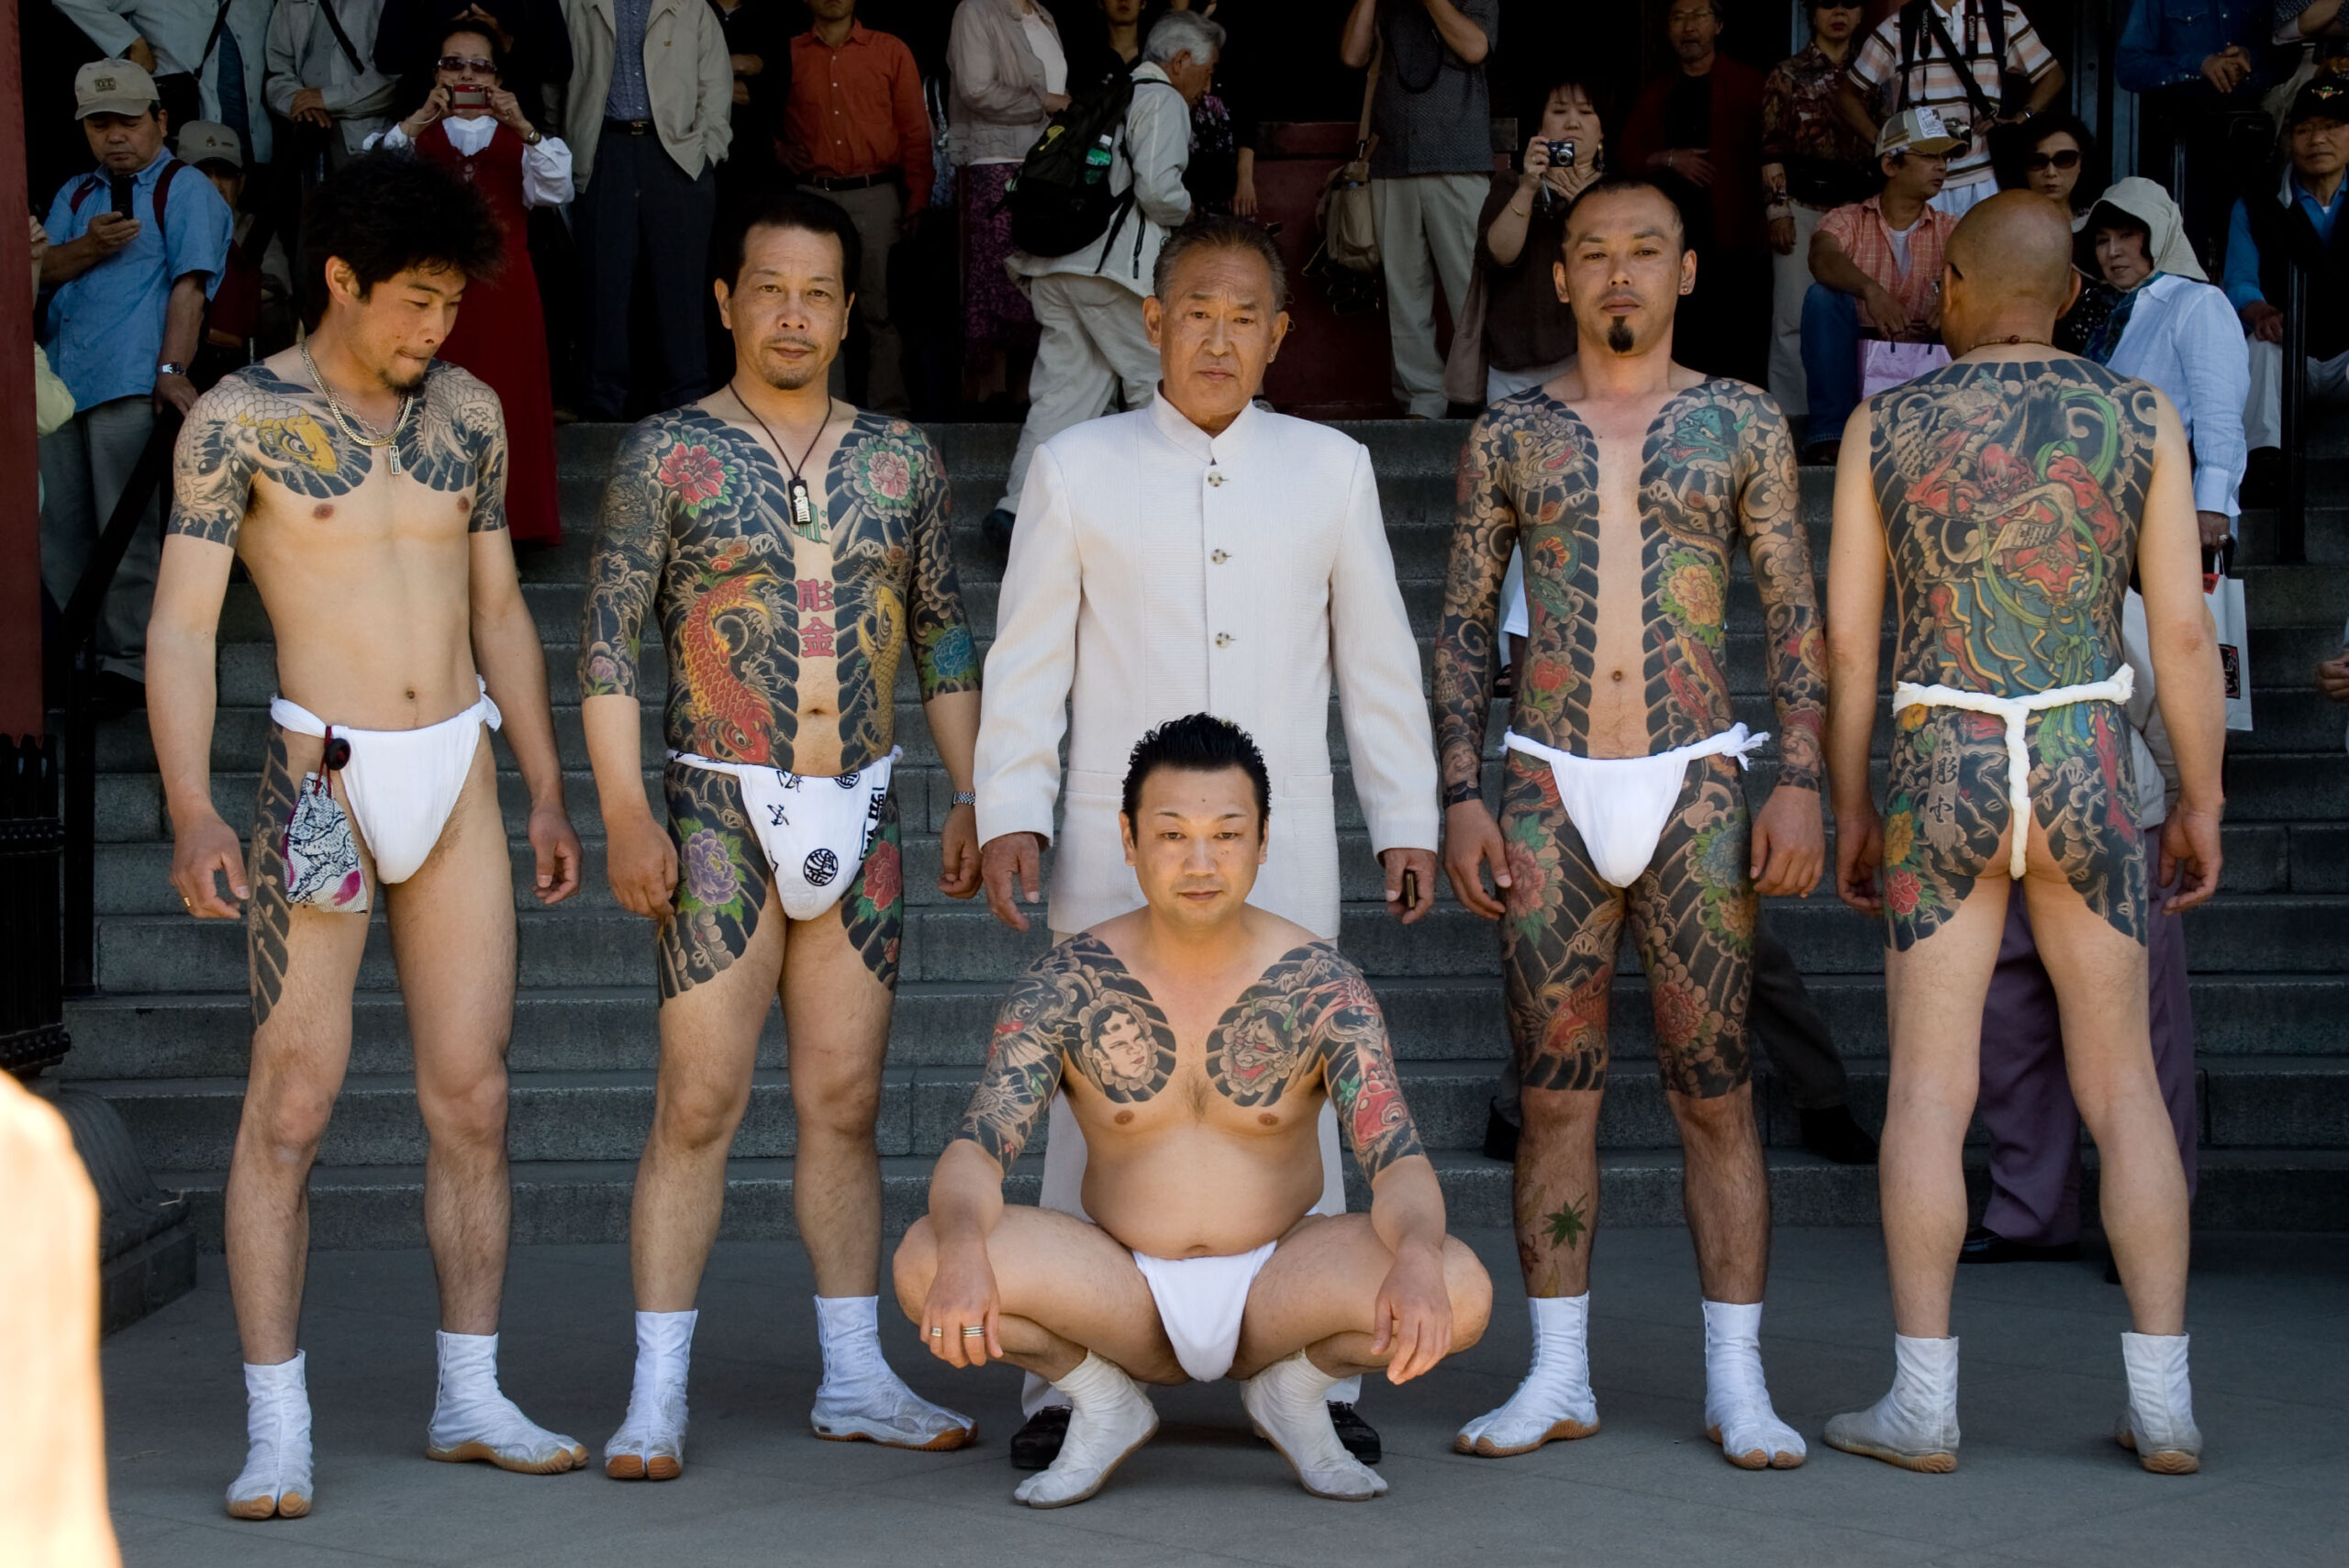
Every great Japanese tattoo is built in layers, and the two layers that matter most are the ones clients notice least. The outline is the skeleton: a black drawing that fixes every edge, every boundary, every shape in place. The shading is the flesh: the graduated wash that gives the drawing depth, weight and life. Get the outline wrong and no amount of shading will save the piece. Get the shading wrong and the finest outline will look flat and dead. Yet most people choosing a wabori tattoo spend all their time thinking about the motif — the dragon, the koi, the snake — and none at all on how the outline and the shading will work together. This guide explains how hand-poked tattoos are actually built, layer by layer, so you can judge an artist’s work with your eyes open and commission a piece that will still look good in twenty years.
Related reading: For the wider tradition behind this technique, see our overview Wabori Tattoo: The Art and History of Japanese Tattooing — the style, the technique and the motifs that define it.
Key Takeaways
- A wabori tattoo is built in a fixed order: outline, then shading, then colour. Each layer heals before the next begins, and skipping the order is how pieces are ruined.
- The outline (sujibori) is the architecture. It fixes every edge and boundary; a weak outline cannot be rescued by shading.
- The shading (bokashi) is what makes the tattoo look three-dimensional. It is a graduated wash, darkest at the edges and fading to bare skin, and it is where tebori shines.
- Colour goes in last, packed into the spaces the outline has defined, and only once the shading has settled.
- A full bodysuit is a project of months or years, with healing time between every stage — plan for the long term, not for a single sitting.
- Most shading failures are failures of patience — overworked skin, rushed healing, and too much ink too fast — not failures of talent.
Table of Contents
- Outline First: Why the Line Comes Before Everything
- Sujibori: The Outline as Architecture
- Bokashi: The Shading That Gives a Tattoo Its Depth
- Colour: The Last Layer, and Why It Waits
- How a Bodysuit Is Built Over Months and Years
- What Can Go Wrong: Blowouts, Overwork and Fading
- Safety and Aftercare
- Frequently Asked Questions
Outline First: Why the Line Comes Before Everything
The problem with judging a tattoo by its motif is that the motif is the last thing to go wrong. A client falls in love with a dragon design, books the artist, and sits for the outline — and only then discovers that the outline is shaky, that the dragon’s jaw is crooked, or that the composition does not fit their back. By then it is too late: the outline is permanent, and everything that follows will be built on it. The outline is the foundation of the piece in the most literal sense. It is the drawing, transferred to skin and fixed in black, and every later decision — where the shading goes, how dark it is, which colours fill which spaces — is constrained by it. The Irezumi article describes this staged, full-body approach as the heart of the Japanese tradition, and the staging exists for a reason: each layer must be right before the next is added.
Shading and outline are therefore not rivals, and they are not interchangeable. They are two different jobs, done with different tools, different inks and different techniques, and the art lies in how they work together. The Tattoo article places the Japanese method in a global context, noting that hand-poked techniques survive alongside machine tattooing and that the division of labour between line and shade is one of the oldest principles in the craft. The table below sets out the difference plainly, because once you can see the two jobs separately, you can judge each of them in an artist’s portfolio — and you can ask better questions in the consultation.
| Aspect | Outline (sujibori) | Shading (bokashi) |
|---|---|---|
| Purpose | Fixes edges, shapes and boundaries | Gives depth, volume and movement |
| When it happens | First, in the earliest sessions | After the outline has healed |
| Ink | Solid black, full strength | Black diluted to a wash, in grades |
| Needle work | Fine, firm line; single steady pass | Broad, soft passes; layered washes |
| Tebori strength | Bold, confident line from a steady hand | Soft graduation that machines struggle to match |
| If it goes wrong | Wobbly or blown lines; hard to fix | Patchy, muddy or overworked grey |
| How to judge it | Look at healed lines: crisp, even, confident | Look at healed shading: smooth, graduated, clean |
The practical lesson is simple: judge the outline first. When you look at an artist’s portfolio, ignore the colour and the subject for a moment and look at the lines. Are they confident or hesitant? Even or wobbly? Do they hold their weight across the whole piece, or do they thin out where the artist got tired? Then look at the shading the same way: does it graduate smoothly from dark to light, or does it jump in steps? Does it follow the form of the body, or does it sit flat? An artist whose lines and shading both hold up after healing is an artist you can trust with a large piece.
Sujibori: The Outline as Architecture
Sujibori is the Japanese word for the outline, and it is treated as a discipline of its own. The artist draws the design on paper, fits it to the body, and transfers it to the skin — traditionally with a stencil, and always with the body’s shape in mind. Then the outline is tattooed in solid black, in a single careful pass, with the needle following the drawing exactly. There is no room for improvisation at this stage: a line that wanders cannot be un-drawn, and a shape that is wrong will be wrong forever. The best outline artists work slowly, with long, steady strokes, and they stop often to check the line against the drawing. A session that looks unproductive — a few hours for a handful of lines — is often the sign of an artist doing this stage properly.
The tool matters, but the hand matters more. A tebori outline is made with a fine needle bundle pushed by hand, and it has a particular quality: the line is bold and slightly alive, with a warmth that a machine line sometimes lacks. A machine outline is made with a tight liner grouping driven by a motor, and it has a different quality: very even, very consistent, very precise. The tattoo machine article explains how the electric machine’s rapid, even puncture pattern produces that consistency, and it is the reason machines are often preferred for very fine detail and small lettering. But for the bold outlines of a traditional Japanese piece, many artists and clients still prefer the hand: the line has character, and character is what a wabori outline is for. Our guide to Japanese sleeve tattoo designs shows how the great compositions depend on a strong outline to hold the sleeve together as a single picture.
The design sources for the outline go back to the woodblock print. The Ukiyo-e article covers the print tradition whose bold, black key lines — the same lines that define a figure in a Kuniyoshi print — became the model for the tattoo outline. The print artist and the tattoo artist faced the same problem: how to define a complex figure with a single black line, and how to make that line carry the whole drawing. A good sujibori line does the same work as a good print line: it tells you where the figure ends and the world begins, and it does it with confidence. When you look at a healed outline, you are looking at the artist’s drawing ability in its purest form, with nothing to hide behind.
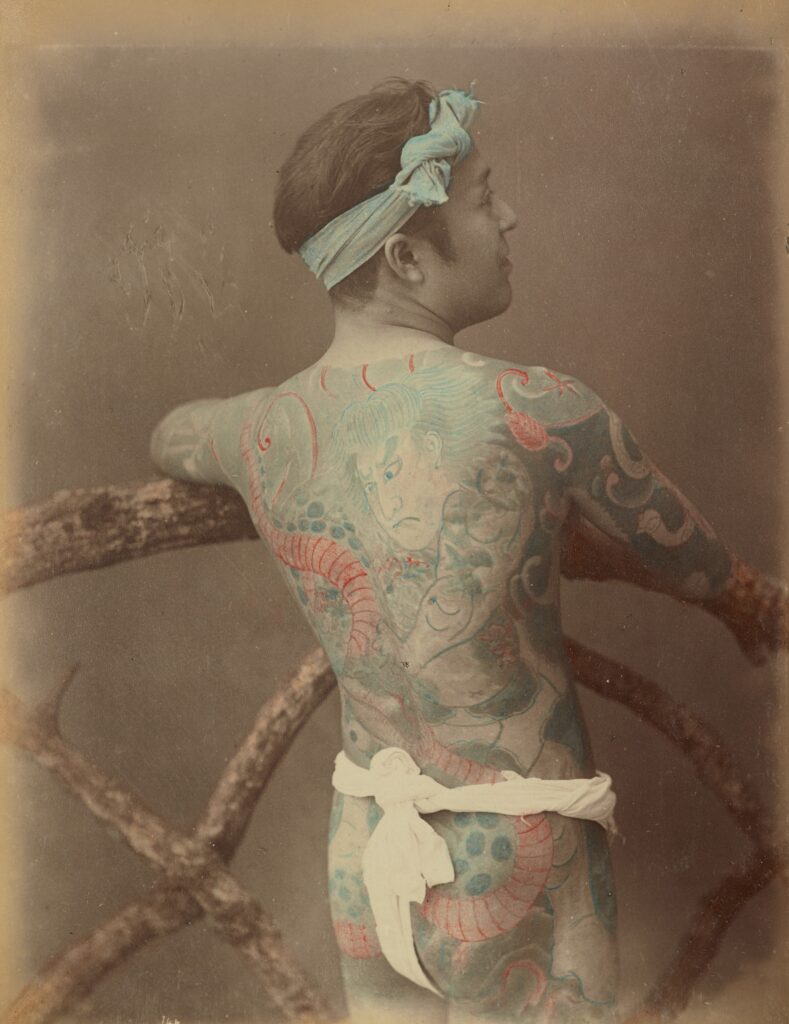
An outline session is also a test of the client. The outline is usually the most painful stage, because it is done on fresh skin with a fine needle and no shading to break up the sensation, and because the artist cannot rush it. Sessions are long, the skin is tender, and the result — a black drawing on irritated skin — looks raw and unfinished. Clients who understand the process accept this; clients who do not sometimes panic and ask for the shading to be rushed in to “finish” the look. Do not. The outline needs to heal fully — usually two to four weeks — before the shading begins, and a healed outline is a different thing from a fresh one: the lines settle, the skin calms, and the artist can see exactly what they have to work with. Patience at this stage is the cheapest insurance a tattoo can have.
Bokashi: The Shading That Gives a Tattoo Its Depth
If the outline is the architecture, bokashi is the weather. Bokashi is the graduated shading wash that gives a Japanese tattoo its sense of depth: the black is diluted with water to a series of greys, and the artist lays them down from darkest to lightest, so that the design seems to rise out of the skin and sink back into it. A dragon’s belly curves because the shading falls away beneath it; a wave crests because the shading darkens at its edge; a peony’s petal folds because the wash deepens in the fold. Without bokashi, a wabori piece is a colouring book — a fine drawing with no volume. With it, the same drawing becomes a living thing. The Tebori entry describes the hand-poking method, and shading is where that method shows its greatest advantage: the hand can lay a wash with a softness and a subtlety that a machine finds hard to match.
The technique is simple to describe and hard to do. The artist prepares several dilutions of black ink — from full strength down to a pale grey — and works from the darkest areas outward, letting each wash fade into the next. The needle bundle for shading is broader than the one used for outlining, so that each pass lays a soft field rather than a hard line, and the artist overlaps the passes to build the graduation. The hand-poked needle leaves a slightly stippled texture, and that texture is the secret of the effect: the eye reads the stipple as softness, the way it reads the grain of a woodblock print. A machine can produce beautiful shading, and modern machine artists use the same wash techniques, but the hand-poked wash has a particular smoky quality that devotees of the tradition prize. When you look at a great bodysuit, the shading is what you are really admiring, even if you think you are admiring the dragon.
Shading is also where the artist’s judgement is most exposed. Too little shading and the piece looks flat; too much and it looks muddy, with the design drowned in grey. The traditional rule is to shade less than you think you need, because the shading darkens slightly as it heals and because the colour that comes later will add its own depth. A good artist will show you the shading at its half-finished stage and explain what will happen next, rather than hiding the work until it is done. Our guide to full back tattoo designs shows how the great back pieces use shading to make a flat back read as a landscape, with mountains, water and sky all built from the same black wash.
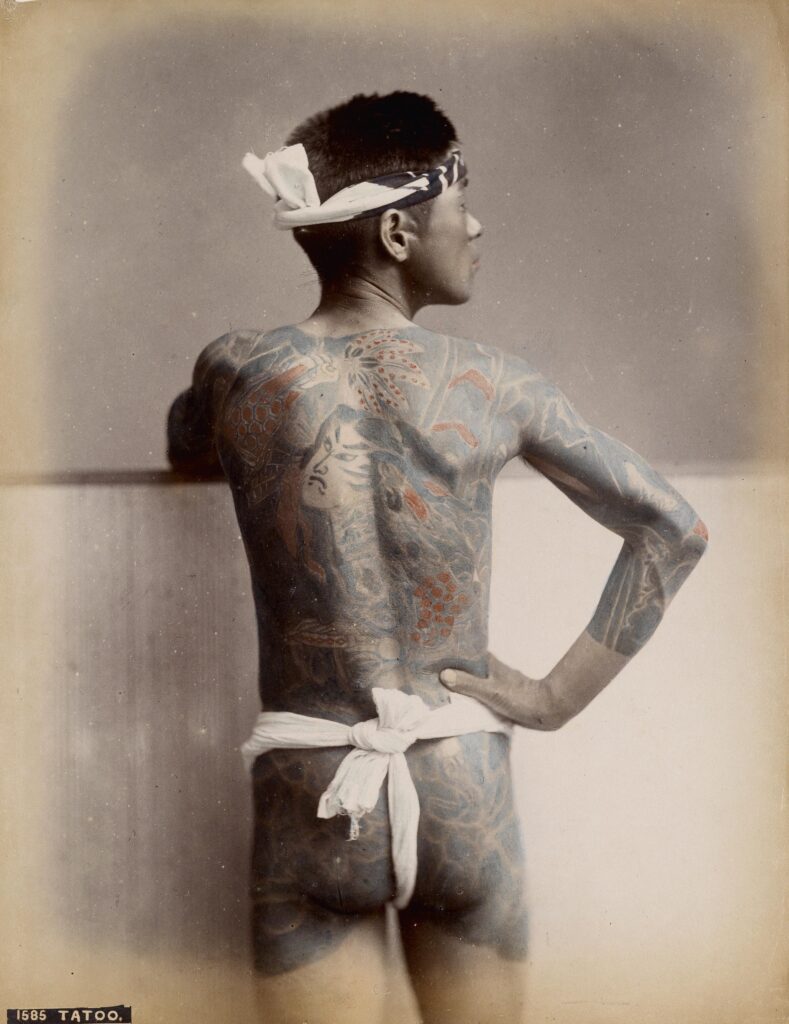
The background is part of the shading, not an afterthought. In a traditional piece, the spaces between the motifs are not left empty. They are filled with wind bars, water, clouds and shading that tie the composition together and give the eye somewhere to rest. This background work is almost entirely shading, and it is what makes a bodysuit read as one picture rather than a collection of separate tattoos. A client who asks for “just the dragon, no background” is asking for a weaker tattoo, and a good artist will say so. The background is where the shading does its quietest and most important work, and it is worth paying for.
Colour: The Last Layer, and Why It Waits
Colour is the reward for patience, and it only works because it comes last. Once the outline has healed and the shading has settled, the artist packs colour into the spaces the outline has defined: red for the peony and the rising sun, green for the leaves and the water, blue for the sky and the waves, yellow for the accents that catch the eye. The colour is laid in solid, with the needle working the pigment into the skin until the field is even, and it is the stage that makes the piece look finished for the first time. Clients often describe the colour sessions as the most satisfying, because the tattoo finally looks like the picture they imagined — but the colour only looks right because the outline and the shading underneath it are right. Colour laid over a weak outline bleeds at the edges; colour laid over poor shading looks flat. The order is the method.
Each colour behaves differently, and a good artist plans for it. Black is the most stable pigment and the backbone of the piece. Red is the most vivid and the most likely to fade or to provoke a reaction, so it is used boldly but carefully. Blues and greens hold well in most skin, while yellows and pale colours are the most fragile and need realistic expectations. The Koi article explains how the carp became a symbol of perseverance, and the koi is the motif that shows colour at its best: the orange and white of the fish against the black shading of the water is a combination that depends entirely on the layers beneath it. Japanese mythology supplies the other great colour subjects — the red face of a demon, the green of a dragon, the gold of a temple — and each of them is a test of whether the artist has built the layers properly. If the colour looks dull or patchy when it heals, the fault is usually in the layer beneath it, not in the pigment itself.
Colour also needs the most aftercare, because it is the most work the skin has to do. A colour session packs more pigment into the skin than an outline or shading session, and the skin responds with more swelling, more weeping and a longer healing time. The aftercare is the same — clean, lightly moisturised, out of the sun — but it matters more, because picking at a healing colour field can pull the pigment out in patches. Our guides to cherry blossom tattoo designs and lotus flower tattoo designs show how colour carries the symbolism of those flowers, and both guides stress the same point: the colour you see on the day is not the colour you will keep, and the healed colour — softer, deeper, settled — is the real tattoo.
How a Bodysuit Is Built Over Months and Years
A full bodysuit is not a tattoo. It is a project, and it should be planned like one. The work begins with a consultation, sometimes several, in which the artist and the client agree the design, the placement and the pace. Then the outline is drawn and tattooed, section by section — the back first, usually, then the chest, the arms and the legs — with healing time between each section. Then the shading follows the same route, and then the colour. At every stage, the artist is working on healed skin, seeing the piece as it really is, and adjusting the next stage to what the last one produced. Horiyoshi III’s biography tells how one master took this process to its highest level, and his bodysuits remain the standard against which the work is judged: not because they are the biggest, but because every layer is in its place and every stage was given its time.
Encyclopaedia Britannica’s account of tattooing helps explain why this slow method survived in Japan when faster methods were available: Britannica’s tattoo overview describes tattooing as a practice with deep cultural roots, and the Japanese bodysuit is the fullest expression of the idea that a tattoo is a life’s work rather than an afternoon’s decoration. The association with the underworld is part of that history: the Yakuza article notes the long link between organised crime in Japan and the full-body tattoo, and the bodysuit’s hidden, private character — worn under clothes, shown only to those who understand it — comes from that history. Today most bodysuit wearers have no connection to crime, but the discipline of the process remains: a bodysuit is earned, session by session, and it cannot be rushed.
The practicalities are worth facing honestly before you begin. A bodysuit takes years, costs thousands, and demands regular travel to the artist’s studio, time off work for healing, and a willingness to live with a half-finished piece for a long time. The outline stage alone can take a year. Many clients find the middle of the process the hardest: the back is done and the arms are not, the shading is half finished, and the piece looks incomplete. That is normal, and it is why the relationship with the artist matters so much — you are choosing a companion for a long project, not a supplier for a single purchase. Our guides to back tattoos for men and men’s chest tattoo designs show how the great compositions use the torso as a single canvas, and a consultation with a bodysuit artist will do the same for your body, your design and your budget. For a smaller first step, our tattoo design ideas for women guide covers pieces that carry the same tradition at a scale that suits a first large tattoo.
The finished bodysuit is the proof of the method. When the outline, the shading and the colour have all been given their time, the result is a single picture that moves with the body and reads clearly from across a room. The festivals where bodysuits are worn openly — above all the Sanja Matsuri — are the public face of that achievement, and they are the best place to see what the layers add up to. Our geisha tattoo designs and dragon tattoo designs guides show two of the great bodysuit subjects, and both depend on the same layered construction: a bold outline to hold the figure, soft shading to give it volume, and colour to bring it alive.
What Can Go Wrong: Blowouts, Overwork and Fading
The most common outline failure is the blowout, and it is easy to understand once you know how the skin works. If the needle goes too deep, the ink spreads into the fatty layer beneath the dermis and the line blurs into a soft halo. A blowout cannot be undone, though a skilled artist can sometimes disguise it by thickening the line or adjusting the design. Blowouts happen with both tools, but they are more likely when the artist is rushing, when the skin is thin, or when the outline is worked over too many times. The body modification article treats tattooing as a deliberate alteration of the body, and the blowout is a reminder that the body has its own say in the matter: the skin is not paper, and it does not forgive carelessness.
Overwork is the shading equivalent, and it is the more common problem in large pieces. Skin that is passed over too many times, or shaded before it has healed, becomes traumatised: it swells, it weeps, it scars, and the ink heals patchily or falls out. The temptation is understandable — the artist wants the shading to be dark enough, the client wants the session to be finished — but the skin sets the pace, and fighting it always loses. A good artist will stop a session early rather than overwork the skin, and will send a client home with the shading half done rather than push through. That restraint is the mark of experience, and it is worth more than any amount of enthusiasm.
Fading is the slow failure, and it is largely a matter of sun and time. All tattoos fade, and shading fades first, because the wash is thinner than the solid outline. Sun exposure is the great accelerator: ultraviolet light breaks down pigment, and a bodysuit that is regularly exposed to strong sun will lose its shading years sooner than one that is protected. There is no way to stop fading entirely, but there is a way to slow it: keep the tattoo out of the sun, use sunscreen on it when it must be exposed, and expect to have the shading refreshed after a decade or so. A touch-up is not a failure. It is maintenance, and a good artist will plan for it from the beginning.
Safety and Aftercare
The layers do not change the risks, and the risks do not care which tool you choose. Every tattoo breaks the skin, and every broken skin carries the same risks: infection, allergic reaction, and, where equipment is shared or reused, blood-borne disease. Mayo Clinic’s tattoo safety guidance advises checking that the studio is licensed, that it uses sterile, single-use needles and fresh ink for each client, and that the artist wears gloves and works on clean, disinfected surfaces — and it warns that tattoos can cause allergic reactions, skin infections and complications with MRI scans. Those checks apply to a tebori studio and a machine studio alike, and they apply at every stage of a bodysuit, not just the first.
Ask the questions before you book, and ask them again at every stage. Is the studio licensed? Are needles single-use and opened in front of you? Is the ink from sealed, reputable bottles? Does the artist explain aftercare in writing? Tell the artist about any skin condition, allergy or medication, and mention it again on the day — some conditions and medicines change how skin heals, and a bodysuit is a long enough project for your health to change along the way. If you have ever reacted to a tattoo, a piercing or a metal, say so before the outline begins, not after the colour is in.
Aftercare is the same for every layer and it is not optional. Keep the tattoo clean and lightly moisturised, avoid sun, pools, baths and saunas until the surface has healed, and do not pick at peeling skin. Expect soreness, redness and itching for a few days, and peeling for a week or two, after every session — not just the first. See a doctor promptly if you notice spreading redness, swelling, heat, pus or a fever — those are signs of infection, and early treatment matters. The tattoo you take home after each session is only half the work; the other half is how you look after it while it heals, and a bodysuit gives you many chances to get that right.
Our View: If we could give every client one piece of advice about wabori, it would be this: fall in love with the shading, not just the outline. The outline is what you see in the shop window, but the shading is what you will live with — it is the depth, the softness and the life of the piece, and it is where the great artists separate themselves from the good ones. Choose an artist whose healed shading you admire, give the work the time it needs, and do not rush the layers. A bodysuit built slowly, layer by layer, is one of the finest things a person can wear. A bodysuit built in a hurry is a lesson in why the tradition insists on patience.
— The Tattoo Designs Pictures editorial team
Frequently Asked Questions
What is the difference between outline and shading in a tattoo?
The outline (sujibori) is the solid black drawing that fixes every edge and shape. The shading (bokashi) is the graduated wash that gives the drawing depth and volume. The outline comes first and heals before the shading begins.
Why does shading come before colour?
Colour is packed into the spaces the outline defines, and it only looks right once the shading underneath it has settled. Shading first also lets the artist see how the skin has taken the black before committing to colour.
Is tebori shading better than machine shading?
Many artists and clients prefer the hand-poked wash for its soft, smoky graduation, which suits traditional Japanese work. Machines can produce excellent shading too, and they are often better for fine detail. The artist’s skill matters more than the tool.
How long should I wait between outline and shading?
Usually two to four weeks, until the outline has fully healed and the skin has calmed. Your artist will judge by looking at the healed line, not by the calendar — and a longer wait is always safer than a shorter one.
Can a blown outline be fixed?
A blowout — ink spreading under the skin — cannot be undone, but a skilled artist can often disguise it by thickening the line or adjusting the design. Prevention is better: choose an experienced artist, and do not rush the outline stage.
Questions or corrections? Have a question about shading and outline, or spotted something we should fix? Visit Tattoo Designs Pictures and leave a comment — we read every one, and corrections from readers help keep these guides accurate.
Sources
- Encyclopaedia Britannica, “Tattoo” — britannica.com/art/tattoo
- Mayo Clinic, “Tattoos: Understand risks and precautions” — mayoclinic.org
- Wikipedia, “Irezumi” — en.wikipedia.org/wiki/Irezumi
- Wikipedia, “Tebori” — en.wikipedia.org/wiki/Tebori
- Wikipedia, “Tattoo” — en.wikipedia.org/wiki/Tattoo
- Wikipedia, “Ukiyo-e” — en.wikipedia.org/wiki/Ukiyo-e
- Wikipedia, “Horiyoshi III” — en.wikipedia.org/wiki/Horiyoshi_III
- Wikipedia, “Yakuza” — en.wikipedia.org/wiki/Yakuza
- Wikipedia, “Koi” — en.wikipedia.org/wiki/Koi
- Wikipedia, “Japanese mythology” — en.wikipedia.org/wiki/Japanese_mythology
- Wikipedia, “Tattoo machine” — en.wikipedia.org/wiki/Tattoo_machine
- Wikipedia, “Body modification” — en.wikipedia.org/wiki/Body_modification